|
|
Post by jiterbug on Nov 25, 2015 2:35:18 GMT
That's weird . . . I could swear I've seen that name before! Hmm, it must be deja vu . . . or something? So this is the story of a small Suzuki GS that had dreams; big dreams. Dreams of more power, dreams of speed and style. Dreams of the sound of inline 4 cylinder screaming at 10.000 rpm through gutted pipes! Geez! What a load of horsesh*t!! This will be review for some; for other's it'll be new. So grab a cup of whatever you prefer. Coffee is perkin', make yourself a cuppa, beer is in the fridge. Ahh beer! Sorry! Lets not get distracted. A little history might be helpful. Ever since I was a kid, I wanted a motorcycle. I could look at them all day, didn't really know what I was looking at but man, they sure grabbed my attention! That was as far as I got, looking. Got married, kids, house, shitty job. The works. Every once in a while, I'd mention maybe buying a bike. And there was always something else that needed buying, true enough but DAMN! I finally came to the conclusion that I'd be 75 years old and bent before I actually had money, so 1 day I said to the Mrs. "Mrs, I'm buying a bike." And then I went and bought a bike. She wasn't pleased! At all! She got over it. Eventually. The bike was an '86 Suzuki GS 550. Nice little bike. I rode it for 2 seasons. It had a small oil leak, and I couldn't find where it was coming from for the life of me. Around this time, I found a website devoted to a certain style of bike building, streetfighters! Well I was hooked, the Mrs. was pissed! What to do? By this time, I wanted more bike, but I was getting quotes for insurance for bigger bikes that would make Bill Gates cringe! No problem. I do what any self respecting gear head would do, get a bigger motor. HeHe. Let the mayhem begin. Out comes the leaky old lump, we said a few words over it; and sold it. Good riddance. In the meantime, I found a Suzuki RF900 with a blown motor and bent plastics for a reasonable price. I got the whole bike for the price of the front end. WIN! Made sure the motor turned and took the lot home. So know we have 2 bikes. Someone is going to say, "Jiterbug, why don't you just fix the motor in the RF and ride that?" Remember the insurance question? I can put double the motor in the GS frame, and still pay the same insurance. Nobody needs to know! I took the GS apart first. I wasn't to worried about this one because I was only using the frame anyway. Then the RF was dismantled. Everything was carefully bagged and tagged. Virtually everything from the RF went on to the GS frame. I used the USD front suspension, the rear suspension and swing arm, the motor of course, the hand controls and the foot controls, the brakes and electrical all came from the RF900. These first pics are from the tear down. |
|
|
|
Post by rusty on Nov 25, 2015 7:55:45 GMT
Grab your popcorn boys. ...this is gon'be good:-D
|
|
|
|
Post by jiterbug on Nov 25, 2015 11:50:47 GMT
Thanks rusty. More coming soon.  Duane |
|
|
|
Post by jiterbug on Nov 29, 2015 0:53:08 GMT
All right. The frame is naked. The first thing to part ways is the seat sub-frame. The original intent was just to cut it off, then reattach it later on a steeper angle and a tad bit shorter. I'll get back to that later. So, the sub-frame didn't go in the discard heap . . . yet. The RF900 motor is actually 943 cc. I'm eyeing up the motor and the frame, hmm, that space looks smaller then the motor. The first attempt didn't go so well. The frame is on the bench and I try to lift the motor into the frame. No go! Let's try something different. Put the motor on the bench, on it's side and drop the frame onto the motor. Well, that seems to work better. It still doesn't fit, but at least I can see where it has to go. The valve cover breather is in the way, off it comes. Still no go. Oil pan comes off next. YEA!!!! It fits. The back motor mount will work, if I make up some spacers. The upper mounts for the original rear suspension will work for another mount. 2 mounts at the front go to the mounting positions for the original oil cooler. I won't need that anyway. We are feeling pretty good about this . . . until I try and fit the carbs. They interfere with the back bone. I tried every which way. Ain't going to work. Well, SH#T!! I grab me a stool and a cup of coffee and have myself a ponder. A different angle? There is only 1 thing to do. That back bone needs to go. Time to go shopping. 1.5" X 3" rectangular tubing. I bent it over an old propane tank with the help of a generous amount of liquid wrench. 1 problem down, still 1 to go, how to get the new back bone in without loosing all the integrity of the frame. I notched the top of the old back bone by the head stock so the rectangular tubing would fit. Then I made a bridge at the bottom of the old back bone to the new back bone. Once the rectangular tubing was tacked in, I cut the old back bone out. Everything was trimmed and then I welded in piece of flat stock over the "bridge" where it met the frame. Done. Now, the carbs fit. SWEET! Looks like progress. I made the mount for the new rear suspension and welded it to the bottom of the back bone. The nice thing about using all parts that come from Suzuki, was interchangeability. The swing arm fit in the frame without modification. I just needed to enlarge the holes in the frame for a larger pivot. Well, that was easy. What about the front suspension? The stem slides into the head stock and the nut tightens up perfectly. The stem is the right length and the bearings are the same. SWEET!! I love Suzuki. Finally; they don't change stuff just for the sake of change. The GS is an '86, the RF is a '94 and almost everything fits the same way. Amazing. Probably 90% of the fasteners were 10mm and 12mm. You don't need that many tools to work on these things. OK, ready for the sub-frame. I set the old sub-frame back in and . . . I don't like it. Actually I hate it. More shopping. 1" round tubing. A bunch of years ago, I bought a cheap tube bender from Princes Auto, so I drag that out from under the bench. The first side wasn't so bad. The second side was a bugger. Trying to make it match the first side only in mirror image was a little taxing on the patience. I walked away a couple times. But it came together in the end. A couple pics. |
|
|
|
Post by jiterbug on Dec 3, 2015 0:47:58 GMT
When we left off last time, we had a roller. It was sittin' on the wheels, with the motor in the frame and motor mounts made. It's coming together nicely. Now, the little things that take a lot of time but seem so inconsequential. All the controls from the RF900 get put onto the GS frame. I cut the old mounts for the foot controls off, made new mounts from steel, and welded them to the frame. I made a small subframe under the seat that holds the foot pegs for the pillion seat. I was pretty sure it never going to see a passenger, but it is also used for the exhaust hanger. It's not a big deal, because I can use it to mount the hard bags when I get around to making them. There is also two extra plates that are mounted under the seat that will be used for the hard bags as well. I welded a plate under the seat subframe and the electrics are all hidden under the seat, including the battery. I'm at the point where I need to figure out what headlight and tank to use. I put the GS light and light fairing up and the GS tank to see what it would look like. It kind of had the look of an '80s muscle bike which I really liked, but the GS tank wouldn't fit over the new back bone without some serious modification to the tunnel. I had an old tank from a Honda Nighthawk laying around so I tried that but it just looked way to small. So then I put up the RF tank and headlight. That was the one. It just looked right. I cut the mount off the RF frame for the headlight fairing and welded it onto the GS. Once the tank was on, I could make a seat. Now that everything is built, it's time to tear it all down again. Everything is taken apart. Down to the bare frame again. I detabbed it to get rid of everything I didn't need, my friend did the final welding for me. The gussets at the headstock were trimmed to make more room to get the motor in and out. I took some 0.25" round bar, bent it to the required shape and welded them in under the gussets at the headstock just to make sure there was enough strength there. I also made a gusset between the back bone and the "bridge" that goes to the where I cut the old back bone out. And one more gusset in the back bone to rear suspension mount area. All the welding done, I took the frame to work and sand blasted it. Before it gets painted, I smoothed all the welds, so there isn't any body filler in the frame. While I was working on the frame, the motor was out. Perfect time to get into that. I knew I needed to get into the motor when I bought the RF900 because the owner said it ran out of oil. Sure enough, the crank messed up along with at least 2 connecting rods; the connecting rod bearings were in the oil pan. I found a crank on Fleabay. Connecting rods, rod bearings, main bearings and thrust bearing from the dealer. I reused the timing chain, valves, pistons and wrist pins etc. I made sure all the oil passages were clean and free of junk and then put it all back together. A mechanic I am not, so I asked a shop that I was working with at the time if I could do the engine there, so the mechanic could look over my shoulder. No problem. When I had everything apart, I measured everything from the piston bores to all the bearing clearances. So the mechanic asks me if I was going to use plasigage to check my bearing clearances. I told him I didn't need to because I measured everything with a 0.0001" dial gauge, you know, like how it is supposed to be done. I'm a machinist, measuring I can do. While the motor was apart, I painted the body work and frame. The frame and swing arm were painted a sandstone, the bodywork was painted aquamarine blue, a GM color, and the rims were painted burnt orange. For the artwork, I didn't want to do the same as everybody else; so no skulls or evil stuff. Instead, I decided to do an angel theme. That is what the wings and portrait are on the tank. On the front fairing I painted a Maltese cross because I am a volunteer fire fighter. The orange graphic on the side of the tank is asymetrical, just because it bugs people and the orange graphic on the fairing is endless, symbolizing God. Now the motor is done and everything is ready for final assembly. This building bikes stuff is pretty incredible. We get to test ourselves, trying new things and expanding our skills. While I hope never to sell this bike, I will still build bikes. It is just so much fun. It's too bad we need sleep, 'cause I could do this 24/7 and never run out of ideas and stuff to try. What a blast!! |
|
|
|
Post by jiterbug on Dec 3, 2015 0:51:30 GMT
A couple more pics The last one is a problem solving flow chart that I found very helpful. Duane |
|
|
|
Post by jiterbug on Dec 3, 2015 23:06:47 GMT
Here is a little sneak peak of what the future holds. Attachments:
|
|
|
|
Post by rusty on Dec 4, 2015 11:57:18 GMT
Brilliant!!
|
|
|
|
Post by jiterbug on Dec 4, 2015 23:00:44 GMT
This is on the back burner for now. I want to change over to fuel injection the same time I do the turbo. The plan is to use microsquirt and machine a custom intake that will use a single throttle body from a small gas engine.
|
|
|
|
Post by jiterbug on Feb 16, 2016 0:24:52 GMT
OK. Back to the bike. While riding the bike this past summer, I was chasing this issue. Basically, It wouldn't rev past about 5k rpm. I was chasing my tail all summer. Tried the easy things first . . . vent tube in the fuel tank, fuel pump, had the carbs synced, had a shop check valve timing. Everything looked right. The problem persisted . . . F%$$##%!!!!!!! Stage 2. Tried bigger main jets. No change! Put the stock jets back in. I bought new DYNA coils. No change! Well F@#%% me! Then I tried smaller main jets. Holy Crap . . . it actually got better . . . not perfect, but better. So I said to myself, "Self, that beautiful intake you made too small! Damn it!" So know I need a new plan for the air intake. Slim, now's your time. You have any ideas? I'd love to get pod filters but the middle 2 cylinders are very close to the back bone. I would need 45 degree angle silicon attachments. Attachments:
|
|
|
|
Post by jiterbug on Feb 16, 2016 22:48:27 GMT
I'm with you on fitting the turbo. Unfortunately, it's not in the cards at the moment.
I looked for cone filters before I made the intake. I couldn't find any at the time. Also had a problem finding the silicon connecting pieces. I think, if I can find those parts, that is my best bet for the time being.
I don't think the warm air from the top of the transmission where the air filters will be would be an issue.
When the time comes for the turbo, I want to make an intake manifold that uses a single throttle body, not 4 separate throttle bodies. That way, I can make the jump to fuel injection at the same time I do the turbo. That is the plan as of right now anyway. But things tend to change without notice.
Anyway, any help on where I can find pod filters and silicon connectors would help tremendously.
|
|
|
|
Post by 370steve on Feb 17, 2016 0:04:36 GMT
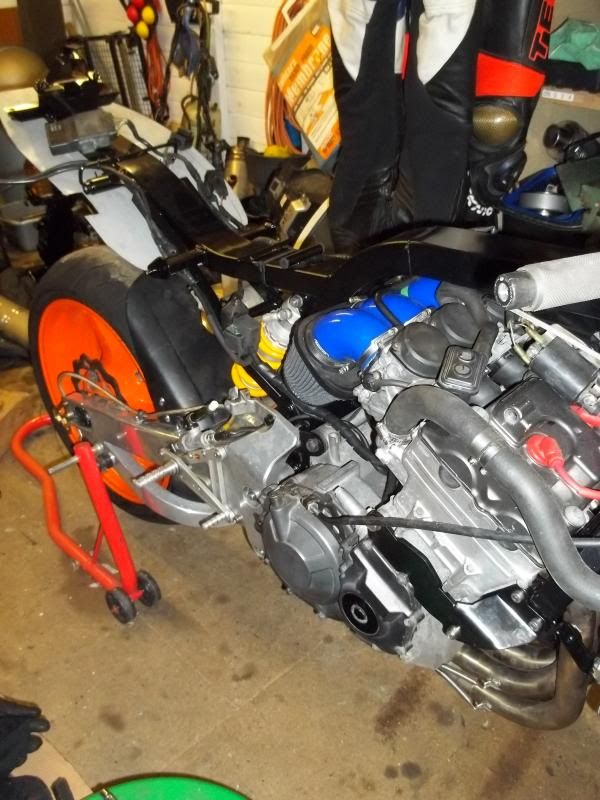
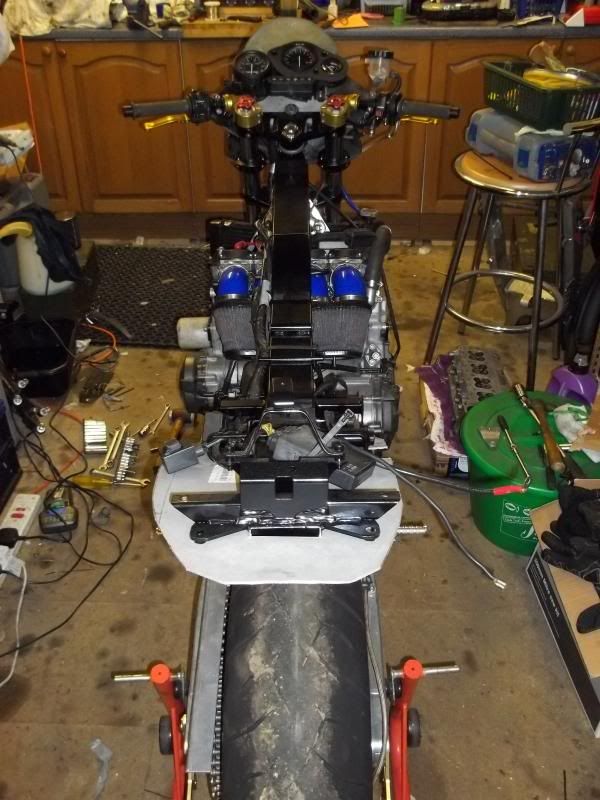
i had fitment problems with my blade engine fitment, so i used hoses to get the clearance i needed for the filters   |
|
|
|
Post by jiterbug on Feb 17, 2016 11:41:41 GMT
Hey Steve. That is what I need. It looks like you have 2 filters feeding 4 cylinders? Can you tell me where you found those?
Thanks
|
|
|
|
Post by 370steve on Feb 17, 2016 12:51:36 GMT
Hey Steve. That is what I need. It looks like you have 2 filters feeding 4 cylinders? Can you tell me where you found those? Thanks they are K&N double pods mate, see if i can dig out the specs for you! but you might need different ones for your carbs. I still have them and the hoses (as in the picture) if they will be any good to you? |
|
|
|
Post by paddy on Feb 17, 2016 15:42:47 GMT
i had fitment problems with my blade engine fitment, so i used hoses to get the clearance i needed for the filters   That's a MANS kitchen lol |
|


